Flowable6.4 - Behavior改变ConditionExpression | 字痕随行
原创 字痕随行 字痕随行
收录于话题
#流程引擎
52个
上一篇简单介绍了一下如何自定义Behavior,此篇就试验一个稍微复杂一些的:使用Behavior改变ExclusiveGateway的Outgoing条件。
先上流程图:
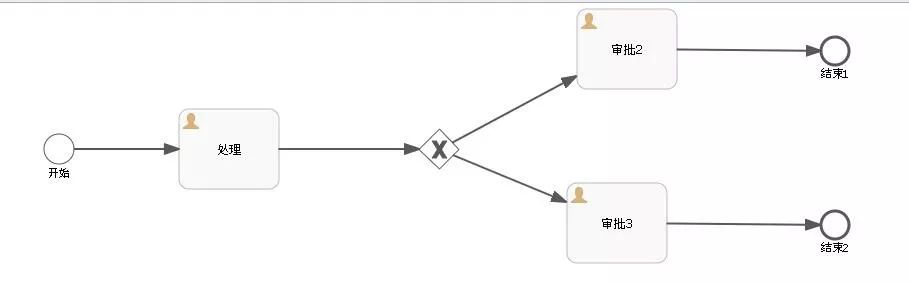
设置一下分支节点(ExclusiveGateway)后面两条路径(SequenceFlow)的执行条件:
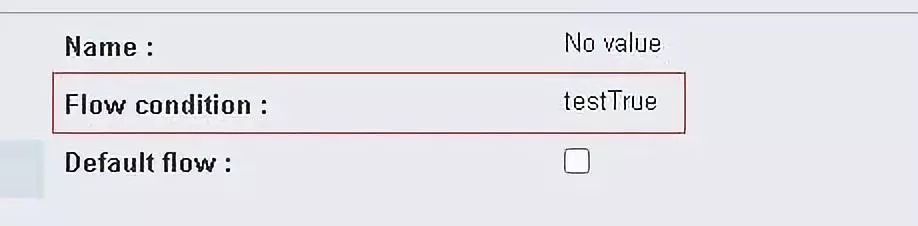
第一条路径
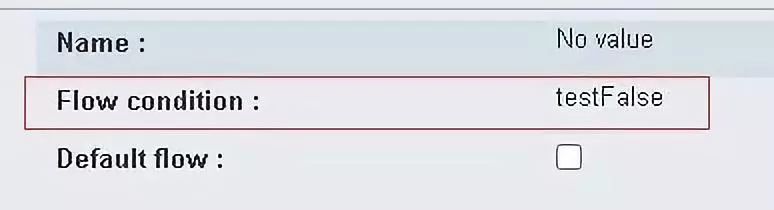
第二条路径
然后,扩展一个ExclusiveGatewayActivityBehavior,源码如下:
public class ExtExclusiveGatewayActivityBehavior extends ExclusiveGatewayActivityBehavior {

    private static final long serialVersionUID = -2245991955225188129L;

    @Override
    public void leave(DelegateExecution execution) {
        ExclusiveGateway exclusiveGateway = (ExclusiveGateway) execution.getCurrentFlowElement();
        for (SequenceFlow sequenceFlow : exclusiveGateway.getOutgoingFlows()) {
            if ("testTrue".equals(sequenceFlow.getConditionExpression())) {
                sequenceFlow.setConditionExpression("${1==1}");
                System.out.println("经历过网关,设置条件为1==1");
            } else if ("testFalse".equals(sequenceFlow.getConditionExpression())) {
                sequenceFlow.setConditionExpression("${1!=1}");
                System.out.println("经历过网关,设置条件为1!=1");
            } else {
                System.out.println("经历过网关,保持原条件");
            }
        }
        super.leave(execution);
    }
}
上面代码的逻辑很简单,在遇到testTrue时,自动将条件变更为${1=1},即永远为True,在遇到testFalse时,正好与testTrue时相反。
在上一篇中的BehaviorFactory设置一下,代码如下:
@Override
public ExclusiveGatewayActivityBehavior createExclusiveGatewayActivityBehavior(ExclusiveGateway exclusiveGateway) {
    return new ExtExclusiveGatewayActivityBehavior();
}
直接运行一下这个流程,控制台内就会输出:
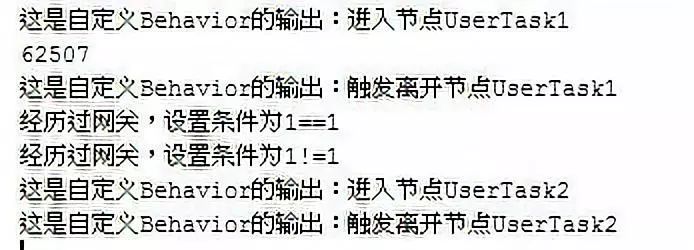
上图中的UserTask2代表审批2,可以看到条件起作用了。
如果将Behavior的代码改为下面这样:
public class ExtExclusiveGatewayActivityBehavior extends ExclusiveGatewayActivityBehavior {

    private static final long serialVersionUID = -2245991955225188129L;

    @Override
    public void leave(DelegateExecution execution) {
        ExclusiveGateway exclusiveGateway = (ExclusiveGateway) execution.getCurrentFlowElement();
        for (SequenceFlow sequenceFlow : exclusiveGateway.getOutgoingFlows()) {
            if ("testTrue".equals(sequenceFlow.getConditionExpression())) {
                sequenceFlow.setConditionExpression("${1!=1}");
                System.out.println("经历过网关,设置条件为1!=1");
            } else if ("testFalse".equals(sequenceFlow.getConditionExpression())) {
                sequenceFlow.setConditionExpression("${1==1}");
                System.out.println("经历过网关,设置条件为1==1");
            } else {
                System.out.println("经历过网关,保持原条件");
            }
        }
        super.leave(execution);
    }
}
也就是将条件反转一下,再执行一下流程,就会发现如下的输出:

上图中的UserTask3代表审批3,可以看到条件依然生效了。
究其原因,可以阅读一下ExclusiveGatewayActivityBehavior的源码,在其leave()方法中,可以看到比较关键的一段:
Iterator<SequenceFlow> sequenceFlowIterator = exclusiveGateway.getOutgoingFlows().iterator();
while (outgoingSequenceFlow == null && sequenceFlowIterator.hasNext()) {
    SequenceFlow sequenceFlow = sequenceFlowIterator.next();

    String skipExpressionString = sequenceFlow.getSkipExpression();
    if (!SkipExpressionUtil.isSkipExpressionEnabled(skipExpressionString, sequenceFlow.getId(), execution, commandContext)) {
        //开始寻找条件为True的那条路径,如果找到之后就使用这条路径流转
        boolean conditionEvaluatesToTrue = ConditionUtil.hasTrueCondition(sequenceFlow, execution);
        if (conditionEvaluatesToTrue && (defaultSequenceFlowId == null || !defaultSequenceFlowId.equals(sequenceFlow.getId()))) {
            if (LOGGER.isDebugEnabled()) {
                LOGGER.debug("Sequence flow '{}' selected as outgoing sequence flow.", sequenceFlow.getId());
            }
            outgoingSequenceFlow = sequenceFlow;
        }

    } else if (SkipExpressionUtil.shouldSkipFlowElement(skipExpressionString, sequenceFlow.getId(), execution, Context.getCommandContext())) {
        outgoingSequenceFlow = sequenceFlow;
    }

    // Already store it, if we would need it later. Saves one for loop.
    if (defaultSequenceFlowId != null && defaultSequenceFlowId.equals(sequenceFlow.getId())) {
        defaultSequenceFlow = sequenceFlow;
    }

}
这个示例如果扩展一下,其实可以加入Groovy脚本引擎来作为条件控制方,具体的实现就看自身场景需要了。
以上就是本次的内容,欢迎指正和探讨。

觉的不错?可以关注我的公众号↑↑↑